

Tutorial
Time required : 1 hour
Pre-requisites : Intermediate JavaScript, canvas experience useful
What is covered : Particle systems, simple physics and easing
Creating fireworks using the HTML 5 canvas: both awesome and fun to do. And that’s exactly what we’ll be doing today! As you can see from the description above, we’ll be covering particles, physics and easing so even if fireworks aren’t your thing (there’s the door!) there should still be a lot of transferable coding goodness.
Note : there is currently a performance issue on Firefox and it seems to be something to do with the ‘lighter’ composite operation mixed with alpha blending. We’re working hard to see if we can improve things and we’ll be in touch with Mozilla too to see if they can help! But in the meantime, sadly this code works much better in WebKit-based browsers.
Let’s start by talking about what we’re trying to achieve:
- We launch fireworks into the air
- At some point, with them being fireworks, they’re going to explode
- We need to render everything on screen (or this will be the worst fireworks show of all time)
It’s really that simple! The code that we’ll be talking about is available here, and it would be good to have that open alongside this so you can see exactly what I’m talking about.
Particles
Let’s start by talking about particles. Particles sound like they should be difficult to understand, but actually that’s not the case.
The way I think about them is a tiny little speck, and that’s about it. Because they’re a speck, though, they are subject to forces and collisions, so they can be pretty handy in terms of simulating fluids, smoke and all manner of things. In our case, they’re very handy for modelling a firework!
We can visualise that our firework shooting up into the air is a particle and, when it explodes, that each little bit that flies off is also a particle. I’ll also say at this point that we are going to be using two different animation methods for our particles: a target-based easing version for before the firework explodes (because we want a lot of control over where it goes on screen) and a physics based version after it explodes (because we’re happy for things to look natural and behave as they would in the real world). It’s great to understand both ways of controlling animation, and also when it’s best to use one or the other. If you’re confused over what I’m talking about it should all make sense once we’re done.
So since we’ve talked about particles let’s have a look at the JavaScript responsible:
216 217 218 219 220 221 222 223 224 225 226 227 228 229 230 231 232 233 234 235 236 237 238 239 240 241 242 243 244 245 246 247 248 249 250 251 252 253 | /** * Represents a single point, so the firework being fired up * into the air, or a point in the exploded firework */ var Particle = function(pos, target, vel, marker, usePhysics) { // properties for animation // and colouring this.GRAVITY = 0.06; this.alpha = 1; this.easing = Math.random() * 0.02; this.fade = Math.random() * 0.1; this.gridX = marker % 120; this.gridY = Math.floor(marker / 120) * 12; this.color = marker; this.pos = { x: pos.x || 0, y: pos.y || 0 }; this.vel = { x: vel.x || 0, y: vel.y || 0 }; this.lastPos = { x: this.pos.x, y: this.pos.y }; this.target = { y: target.y || 0 }; this.usePhysics = usePhysics || false; }; |
Of note are the pos and vel properties. These describe the position and velocity of our particles. The rest is pretty much all window dressing for rendering, so we’ll come back to that in a bit.
We have a particle, but that doesn’t really mean a lot. After all, it’s not exactly doing anything. For that we really need to take a step back and look at the bigger picture.
To begin with we have to set everything up, which you’ll see in the initialize method:
34 35 36 37 38 39 40 41 42 43 44 45 46 47 48 49 50 51 52 53 54 55 56 57 58 59 60 61 62 63 64 | /** * Create DOM elements and get your game on */ function initialize() { // start by measuring the viewport onWindowResize(); // create a canvas for the fireworks mainCanvas = document.createElement('canvas'); mainContext = mainCanvas.getContext('2d'); // and another one for, like, an off screen buffer // because that's rad n all fireworkCanvas = document.createElement('canvas'); fireworkContext = fireworkCanvas.getContext('2d'); // set up the colours for the fireworks createFireworkPalette(12); // set the dimensions on the canvas setMainCanvasDimensions(); // add the canvas in document.body.appendChild(mainCanvas); document.addEventListener('mouseup', createFirework, true); document.addEventListener('touchend', createFirework, true); // and now we set off update(); } |
In here you can see that we’re creating a couple of canvases and attaching some event handlers for touch and mouse events. At the end of the function we call update(), and that’s where it actually gets a little more interesting.
You’ll see around the code that we have one array called particles. This array contains all the currently active particles. When we create a new firework, we push on a particle, and when that firework explodes we push on a whole heap of particles, one to represent each exploded piece!
So with that said, what actually happens inside the update function?
111 112 113 114 115 116 117 118 | /** * The main loop where everything happens */ function update() { clearContext(); requestAnimFrame(update); drawFireworks(); } |
Not a lot, it seems. Clear the canvas context, draw the fireworks, schedule the next update. Let’s take each bit in turn.
Clearing the canvas is pretty straight forward. We fill the entire canvas with a semi-transparent black rectangle:
120 121 122 123 124 125 126 127 | /** * Clears out the canvas with semi transparent * black. The bonus of this is the trails effect we get */ function clearContext() { mainContext.fillStyle = "rgba(0,0,0,0.2)"; mainContext.fillRect(0, 0, viewportWidth, viewportHeight); } |
The reason we don’t fill it with opaque black is so that we can see a bit of the previous frames that were drawn. Over time this gives us trailing effects, which are very handy in this case since fireworks leave trails in the sky as they explode!
Next we call requestAnimFrame, which is a way of scheduling up the next update. You could call setInterval or setTimeout to do something similar, but requestAnimFrame is the best way to do animation in the browser. If it’s not supported the code we’re using will fall back to setTimeout – great!
Finally we draw the fireworks:
129 130 131 132 133 134 135 136 137 138 139 140 141 142 143 144 145 146 147 148 149 150 151 152 153 154 155 156 157 158 159 160 161 162 163 | /** * Passes over all active particles * and draws them */ function drawFireworks() { var a = particles.length; while(a--) { var firework = particles[a]; // if the update comes back as true // then our firework should explode if(firework.update()) { // kill off the firework, replace it // with the particles for the exploded version particles.splice(a, 1); // if the firework isn't using physics // then we know we can safely(!) explode it... yeah. if(!firework.usePhysics) { if(Math.random() < 0.8) { FireworkExplosions.star(firework); } else { FireworkExplosions.circle(firework); } } } // pass the canvas context and the firework // colours to the firework.render(mainContext, fireworkCanvas); } } |
As you can see that involves looping through the particles array, calling update against each firework and then rendering. What’s interesting inside there is that update returns a true or false. We’ll talk about why that is in a little bit. Again, though, nothing too crazy right?
If you’re wondering why I’m going backwards through the array, this is a micro-optimisation purely for speed. While loops going backwards are often faster than for loops going forward, but really you’ll only see benefits if you’ve got a lot of particles. As it happens I’m something of a sucker for any optimisations I can think of in my main loops, and this one is something of a habit for me!
Now that we’ve talked about the overall scheme of things, let’s talk about the fireworks in more detail. We need to talk about three things: colour, pre-explosion and the explosion.
Colour me impressed
Here’s the bigGlow image we’re using for our particles :

A fuzzy white glow. Well, actually is a fuzzy transparent glow, with an opaque black outline. We’ll create a single off-screen canvas and draw a sheet of different coloured particle images into it.
For each colour, we draw a solid coloured rectangle, and then draw the particle glow on top of it. As our bigGlow image is transparent in the middle, our colour shows through it.

Here’s the code:
74 75 76 77 78 79 80 81 82 83 84 85 86 87 88 89 90 91 92 93 94 95 96 97 98 99 100 | /** * Creates a block of colours for the * fireworks to use as their colouring */ function createFireworkPalette(gridSize) { var size = gridSize * 10; fireworkCanvas.width = size; fireworkCanvas.height = size; fireworkContext.globalCompositeOperation = 'source-over'; // create 100 blocks which cycle through // the rainbow... HSL is teh r0xx0rz for(var c = 0; c < 100; c++) { var marker = (c * gridSize); var gridX = marker % size; var gridY = Math.floor(marker / size) * gridSize; fireworkContext.fillStyle = "hsl(" + Math.round(c * 3.6) + ",100%,60%)"; fireworkContext.fillRect(gridX, gridY, gridSize, gridSize); fireworkContext.drawImage( Library.bigGlow, gridX,<a href="http://creativejs.com/wp-content/uploads/2011/12/firework-palette.png"><img src="http://creativejs.com/wp-content/uploads/2011/12/firework-palette.png" alt="" title="firework-palette" width="121" height="121" class="alignnone size-full wp-image-2301" /></a> gridY); } } |
and it gives us a block that looks like this:
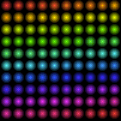
So hopefully you can see how that works. What is really useful in this function is the HSL, which stands for hue-saturation-lightness. It’s a far more convenient way of choosing colours in this instance than RGB because it allows us to se a fixed saturation (100%) and lightness (60%) and then we simply cycle through the hues (through the rainbow – whee!) to get our blocks of colours.
Now we can use this to look up a source particle image for each colour for the rainbow. One canvas, a set of coloured particle images, looks we’ve got a solution!
Before you explode, let me just say…
When we create a firework and add it to our array of firework particles, it looks a little like this:
165 166 167 168 169 170 171 172 173 174 175 176 177 178 179 180 181 182 183 184 185 186 187 188 189 190 191 192 193 194 195 196 197 | /** * Creates a new particle / firework */ function createParticle(pos, target, vel, color, usePhysics) { pos = pos || {}; target = target || {}; vel = vel || {}; particles.push( new Particle( // position { x: pos.x || viewportWidth * 0.5, y: pos.y || viewportHeight + 10 }, // target { y: target.y || 150 + Math.random() * 100 }, // velocity { x: vel.x || Math.random() * 3 - 1.5, y: vel.y || 0 }, color || Math.floor(Math.random() * 100) * 12, usePhysics) ); } |
You’ll see in the code that I’m using dynamic objects to represent the position, velocity and targets. This is simply a way of grouping up the related properties.
createParticle is unusual in that it’s called twice, once with parameters and once without. When a firework is first created, the function is called without parameters. That’s why you see at the top of the function that it defaults all the values to some basic ones, which in this case puts the firework at the bottom middle of the screen. Later on the same function is called again when the firework explodes. In this case we do set the parameters as we want to be very explicit about the particle positions and velocities.
You can see that we push a new particle into the array with a position and velocity. But you’ll also notice that we set a target. This is because when we are pre-explosion we want the firework to fly to a fixed point on screen, somewhere between 150 and 250 pixels from the top of the screen. The alternative to this would be to model the physics and calculate what velocity the firework would need to get to the same place on screen. This would cause my head to explode, never mind the firework.
So how does setting the target help? Well, if you remember we call update on every firework during the loop. Inside that function you can see that we calculate the distance of the firework to the target and ease it towards that position:
255 256 257 258 | var distance = (this.target.y - this.pos.y); // ease the position this.pos.y += distance * (0.03 + this.easing); |
Now we have a convenient way of getting to our target, we also need to know when it’s arrived, because that’s the time when we want it to explode!
To do that we also take advantage of another feature of fireworks: as they fly they often fade to nothing just before exploding. So what we do is we tie the alpha value of the firework to the distance we calculated above:
283 | this.alpha = Math.min(distance * distance * 0.00005, 1); |
As distance gets smaller so does the alpha value. At the end of the function we have this line:
288 | return (this.alpha < 0.005); |
If the alpha value is very low we return true. This signals back to the drawFireworks function that this firework is ready to explode. Awesome.
Explode!
We’re in a great place, we’re ready to explode our firework. For this part I’m going to discuss one of the two options that our firework will take for exploding, and I’ll let you dissect the alternative.
Back in our drawFireworks function, when the update function returns true we remove our original firework particle and replace it with a whole heap of new ones:
154 | FireworkExplosions.circle(firework); |
This line is the key, as we are calling a function in our as-yet-unmentioned FireworkExplosions object. All this does is provide a function for creating the new particles for the exploded particle:
340 341 342 343 344 345 346 347 348 349 350 351 352 353 354 355 356 357 358 359 360 361 362 | /** * Explodes in a roughly circular fashion */ circle: function(firework) { var count = 100; var angle = (Math.PI * 2) / count; while(count--) { var randomVelocity = 4 + Math.random() * 4; var particleAngle = count * angle; Fireworks.createParticle( firework.pos, null, { x: Math.cos(particleAngle) * randomVelocity, y: Math.sin(particleAngle) * randomVelocity }, firework.color, true); } } |
To achieve the effect we divide a circle into 100 slices, and we create a particle for each slice:
352 353 354 355 356 357 358 359 360 | Fireworks.createParticle( firework.pos, null, { x: Math.cos(particleAngle) * randomVelocity, y: Math.sin(particleAngle) * randomVelocity }, firework.color, true); |
You’ll notice the use of cosine and sine function calls. What this does is give the new particle a velocity that acts in the direction from the centre of the circle to the edge of that slice. If that makes no sense, don’t worry! It’s worth looking at polar coordinates if you ever need a better breakdown of what’s going on.
If you look a bit further down below the circle function you’ll see there’s another function which causes the firework to explode in a star shape instead of a plain old circle. You could, in theory, add any number of functions to this object: boxes, letters, anything! As I said I’ll let you look over the details of the star function to work out how that one is done, but if you create new explosive shapes let me know!
Now that we’ve created all these particles, we apply gravity to them as part of the update. That means that they’ll fall towards the floor or, as we like to call it, the bottom of the browser!
267 268 269 270 271 272 273 274 275 | if(this.usePhysics) { this.vel.y += this.GRAVITY; this.pos.y += this.vel.y; // since this value will drop below // zero we'll occasionally see flicker, // ... just like in real life! Woo! xD this.alpha -= this.fade; } |
Rendering
To this point we’ve got fireworks launching and exploding, but if we want to see anything we need to draw them onto the canvas. Let’s take a look at the actual rendering, since that’s how we get pretty stuff on screen.
299 300 | context.globalCompositeOperation = 'lighter'; context.globalAlpha = Math.random() * this.alpha; |
After a little preamble, we set the composite operation to lighter, which is the same as additive blending – new images get added on top of the colours below and this makes the colours burn out to white. This is equivalent to the Photoshop lighten blend mode, and very in-keeping with our firework look. Then we set the alpha to a random value which makes the fireworks flicker.
Next we draw a trail from the last known position of the firework to the new. This just adds the the movement effect:
302 303 304 305 306 307 308 309 310 311 | // draw the line from where we were to where // we are now context.fillStyle = "rgba(255,255,255,0.3)"; context.beginPath(); context.moveTo(this.pos.x, this.pos.y); context.lineTo(this.pos.x + 1.5, this.pos.y); context.lineTo(this.pos.x + xVel, this.pos.y + yVel); context.lineTo(this.pos.x - 1.5, this.pos.y); context.closePath(); context.fill(); |
Finally we draw a small glow and then the chunk of our coloured firework canvas at the particle’s position.
313 314 315 316 317 | // draw in the images context.drawImage(Library.smallGlow, x - 3, y - 3); context.drawImage(fireworkCanvas, this.gridX, this.gridY, 12, 12, x - 6, y - 6, 12, 12); |
And that’s it!
Conclusion
I hope you’ve enjoyed this explanation of how to create this fireworks effect, and I hope you’ll maybe give it a try yourself.
I’d also like to point out that Seb runs fantastic CreativeJS courses where he covers these kinds of particle effects, and a whole heap more besides. (He didn’t ask me to put this in, by the way, I just figured it’s super relevant!) You should totally check those out and if you can make one, I’d highly recommend it.